Sunday, September 30, 2012

{ Open Call For: Next Home Show Designer Contest }

Link up 
October 1 - December 1, 2012
Winner will be featured at

We are searching for an up and coming Decorator, Designer, or DIYer to feature his/her UPCYCLING design flair at the 2013 Philadelphia Home Show. The winning designer will be given a space to design (top to bottom) at the show to be seen by over 50,000 home owners in the Philadelphia area!

Show us some examples of your creative design projects, which should feature OLD items that have been refurbished, upcycled, and re-purposed.

What we are looking for
  1. Creativity
  2. Innovation
  3. Use of current design trends
  4. Creative upcycled items incorporated into the design
  5. Quality of design and items used in design
  6. Quality of photos
  7. Entrant follow all party rules
Rules and Policies
Rules of Eligibility
  1. Entries must be relevant to the interior design upcycling theme. You may link up as many relavant projects as you like.
  2. Projects/designs MUST be your own work.
  3. All entries must be submitted by December 1, 2012.
  4. You must include a linked party button in ALL linked project posts.
  5. Appreciated: include the linked party button in your side bar.
  6. Appreciated: Please subscribe to and/or follow The Painted Home.
Philadelphia Home Show Event Policies
  1. Entries will be narrowed to (3) three finalists whom will then be interviewed to determine the winner.
  2. Winner must commit to completing a room at the Philadelphia Home Show 2013.
  3. PHS room measures 12' x 20' and include 3 unfinished hard-walls.
  4. Move-in/set up for the room will be January 29 - February 1, at the PA Convention Center; Show dates are February 2 - 10, 2013.
  5. Winner must have his/her room finished by 4 pm on Friday Feb. 1.
  6. Decor for room includes flooring, wall covering, furniture, and decor items.
  7. Complete move-in/set up instructions will be shared with the three finalists.
  8. Winner can be onsite at the show to promote his/her designs, but is not required to be.

BUTTON REQUIRED IN EACH LINKED POST
Here is the button you should include in each of your linked posts.


SUBMIT YOUR ENTRIES BY LINKING UP BELOW
NOTE: Post must meet the rules above.


ADAC Opens its Doors

If you live in Atlanta and are exposed on any level to the world of design, then you most definitely have heard of ADAC.  Until now, ADAC was a place for designers to visit, but the general public wasn't allowed access.  As of tomorrow, October 1st, any and all will be welcomed inside the campus consisting of 550,000 square feet with 60 showrooms offering 1,200 of the industry’s finest product lines including furniture, fabric, rugs, lighting, accessories, floor and wall coverings, antiques, fine art and framing, kitchens, bath, tile and stone, and home theater product.  It is an exciting venture for ADAC and the entire design community.

To kick things off there will be two weeks of events open to the public as well as designers.  For a detailed calendar of events you can visit ADAC's website.  You can register for any of the events listed by going here.  On Wednesday, October 10th, I'll be speaking along with five lovely ladies, Shelly Hart of Design Indulgence, Erika Ward of BluLabel Bungalow, Claire Watkins of High Gloss Blue, and Helen Young of Whitehaven; moderated Wendy Shannon at With a Southern Twist.  We'll be dishing about what is in, what is out and what is hot in the world of blogging and design.  Please join us!  It's a really fun group and I'm sure you will be entertained.


Saturday, September 29, 2012

{ Fall DIY's - Day 5 - Outdoor }

I am NO green thumb. So, I try to avoid as many living plants as possible.
Sometimes my mother plants real, live plants/flowers in my window boxes.
I am not ammused. But, I'm too lazy to take them out. And, I'm especially not a mum person.
They really aren't all that attractive, but they say "Fall".
So I go with it.

Here's what I did to zing up the typical "mums in a window box" type of thing.


It's amazing what a simple pinecone will do.
(And how competitive your children will become when you tell them there is a pinecone collecting contest happening.)
I highly recommend it.

Another spot I used some cheap and easy decorating was my front door.
Now, I'm not actually going to show you my front door, 'cause I haven't painted it yet. snort.
So, you'll have to settle for a peak at the general area of the front door.
And, if you think I've gotten around to painting the actual house yet, your funnier than my friend Lisa. 
And she's funny.
So just imagine a beautiful shade of mocha brown stucco behind all this hdge podge.
Here's what I've got...


 super cute grape crates, from? who knows where. Probably somebody's trash. Or my brother-in-law Pat, who makes his own wine. Yes, yummy.


yes, I believe they were Merlot grapes.


I also threw some pinecones in these window boxes.


With a few candles mixed in.


super cute, right?


Thursday, September 27, 2012

{Fall DIY's - Day 4 - Modge Podge & Pumpkins}


Today is day 4 of Fall DIY week, and it might be the simplest project yet.
It's the modge podge pumpkin.
If you haven't modge podge before, don't be intimidated. It's simple, sloppy, and can be be used in so many ways.
Today we are going to make vintage paper modge podge pumpkins. Say that 10x's fast.

Start with ripping some book pages into 1' strips.


Apply the modge podge liberally to one side of the pumpkin with the cheapest brush you own.


Overlap the pages and add modge podge over top of the paper too.


Let that half of the pumpkin dry before you start work on the other side.
Don't worry about crinkles and bubbles. It will only add to the homemade look. 
I used the modge podge jar to hold the pumpkin while it dried.


A little glitter would be fun too, but I'm out of that at the moment.


Gather a few pinecones from your yard and ta-da. Instant charm.


I think I'd like a little cluster of these cuties. So, I'll be make more today.
Happy Fall!

Wednesday, September 26, 2012

{Fall DIY's - Day 3 - Sweater Pumpkins}

What says "Fall" more than a cable knit sweater? A cable knit pumpkin of course!


Here's to make them.
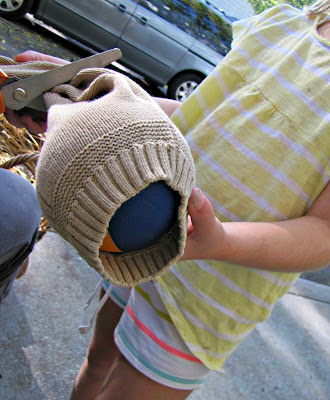
Gather lot's of smaller sized balls from the garage -


Dig into your collection of thrift store sweaters -


Find the sleeve of the sweater - 


Slide a ball through till it just about pops out the wrist -


Trim the sweater a few inches above the ball - 


Tie the top with a rubber band -


Add string, twine, ribbon and voile!


Cable knit pumpkins - 


Now you can cozy up with you cable knit pumpkins and a homemade Chai Tea from yesterday's post.

sharing at

DIY project Parade linky party button


Tuesday, September 25, 2012

{Fall DIY's - Day 2 - Chai Tea}


Add all the ingredients in a blender and blend.


Store in an air tight container for up to 6 months.
I added a little twist to my container with some washi tape.
So simple and easy, and requires pretty much no crafty skills at all.


Ta-Da!


Enjoy on a cold day with a girlfriend!

Monday, September 24, 2012

{A week of Fall DIY's - Day 1 - DIY Vintage Signs}


Welcome! The week is finally here. The week you've all been waiting for...
5 days of DIY's from yours truly.
I hope you find some great inspiration this week to bring a little of Fall into your home.
You don't need any talent to make the things I'm going to show you in the next week.  Just a few simple tools and you'll be on your way to ewwing and awing your mother in law, or your neighbor and may be even your husband.
So channel your inner crafter, grab some sharpies and let's begin!


All you need today is a scrap piece of wood (look on the side of the road, or go grab one from your neighbors scrap pile), some sharpies (or paint if you prefer), and a little pinterest inspiration.
Today's inspiration comes from Kristen at EllaClaire. I found Kristen's work when she was a finalist in Whisperwood Cottages Talent Scouting Party for Autumn decor (I'm number 7, toot toot).
I feel in love with her Pumpkin sign, and you will too.


So let's go...
Start by free handing the words you'd like on your sign. I'm super creative and copied Kristen's words
e x a c t l y.
(why fix it if it's not broken, so go ahead and copy mine too).
Don't worry if you think your printing is crappy. You want it to look hand made.
The quicker you work, the better it looks. So don't spend all day on this part people.


I also added an edge of paint around the edges (where else?).


Fill it in...


Get wild and crazy and go back with a black sharpie and create a shaddow.


Seven minutes later...


Cute, right?
Hope you liked today's idea.
Head back here tomorrow for another Fall DIY!

sharing at
DIY Show Off