Sunday, October 30, 2011

Windows on Design + A Giveaway

WOD

For the last few months I’ve been working with Taylor Galen to create a window display for Regalo AntiquesDesign Collective Atlanta is sponsoring an event called Windows On Design which pairs showrooms and Designers together to create a one-of-a-kind window display.  Taylor Galen from the Taylor Galen Workroom and I were paired with Regalo for the event.  This year’s theme is “Celebrating Atlanta” and we had such a fun time collaborating and coming up with a theme.  There are six other windows being created by various designers and showrooms and each has a different theme centered around our wonderful city. 

Here is a little sneak peek of our design at Regalo.  I’ll share the rest of the design later this week after it has been revealed in the showroom…

Regalo IMG_2891

Windows on Design opens on November 1, 2001 and runs through November 16, 2011.  It is self-guided and can be spread over the two weeks or easily done in a day.  There is a passport to guide you through each display.  You can pick up your “passport” at any location  I encourage you to get the passport stamped at each location because a drawing will be held and one lucky person will win an Atlanta Staycation.  Your stamped passport will be your ticket to win.  For more info about Windows on Design please Click Here.

------------------------------------------------------------------------------------------------------

GIVEAWAY!!

Taylor and I thought it would be fun to do a giveaway with a little piece of our display.  We are giving away two 18x18 pillow covers that we are using in the display. 

Pillow

pillow1  Pillow2

These pink and citrine trellis pillow covers were custom made by the Taylor Galen Workroom and would be beautiful in a guest room or a little girl’s room. 

You have until midnight on Wednesday,November 16th to enter the giveaway.  We will draw the winner on Friday, November 18th.  

There are a few ways to enter the giveaway.  If you do all 4 you will have 4 times the chance of winning…

1.  Leave a comment on this post. 

2.  Visit Taylor’s Blog and leave a comment on her blog. 

3.  Visit our display at Regalo Antiques and leave your name and email address at the showroom with the manager.

4.  Tweet about our giveaway.

Good luck!

Friday, October 28, 2011

{ Fresh Look For A Family Room }

Things have been busy around here, and there are many projects in the works.
But, nothing I can show you just yet.
Yesterday I visited Paula.  Paula wants to adds some style to her family room without
completely making it over (and breaking the budget).
Here's some things I suggested to perk up her room and add some personality to it.

Moritz Family Room
here's what the room looks like now...


She's got a great sectional from Dwelling.
And some great art work.
Now, if we could just make those things P O P !


Here's what Paula's sofa faces.
Dunt dunt dunt dah...
I suggested removing the shelves surrounding the TV
completely and painting the wall behind the TV an accent color
(taken from one of the accent pillows).
We's also paint the cabinets below the TV black.
I'd like to remove the door on the right side closet and create a mini bar.
(Paula and her husband may be so-to-be empty nesters, but they
are in NO way old fuddy dutties.)
Something like this might work

Pinned Image
(Via Real Simple)

Not too shabby, ehh?

If you're looking for some help in your home, send me some pics.
I'd love to help.

See you soon, 
with some fun projects!

Monday, October 24, 2011

{ Embellishing a Lamp }

It's a perfectly fine lamp from Homegoods.
But, I couldn't just leave it alone.


The lamp started like this...


With a little left over paint, hot glue & some fabric flowers,,,


I used some leftover paint and dry brushed the base of
the lamp to add a little zip of turquoise to the room.
(and the Homegoods bag is a perfect drop cloth for the project)


Then, I hot glued a variety of fabric flowers around the shade.


so cute. 


Learn how to make your own fabric flowers here...


Friday, October 21, 2011

{ Design Boards ~ From Start To Finish }


Wondering what my Design Boards are all about?
Recently I designed this board for Lily
(a 10 year old girl)
Lily
The design board can give you all the ideas and items you'll need to turn a room in your
home in to the room you've be dreaming of, but never knew where to start.
I send you a image of the room that will be the starting off point to get your creative juices flowing.
I'll also send you a list of suggested items to purchase to complete this room, along with paint colors, 
fabric choices, and window treatment ideas.
You can use my list and put the room together yourself, or, if your local (in and around Philadelphia, PA)
I can help you in person.

When we started the room looked like this


and now looks like this


Much better for a pre-tween little girl, right?
We used a lot of the original elements in the design board,
and tweeked it along the way as necessary.


I found this great lamp at 
Homegoods, and embellished a little for a custom look.
(more on that later)


Lily has this great stone porch attached to her room.
It was recently enclosed with windows and it is fabulous.
I would love to have a room like this attached to my bedroom.
(it's not finished, so I won't be showing you it just yet,
so use your imagination)


We hung a woven wood roman shade with a blackout liner on her window.
It works really well with her headboard.


Lily's vanity was purchased by her parents years ago when they were on their honeymoon.


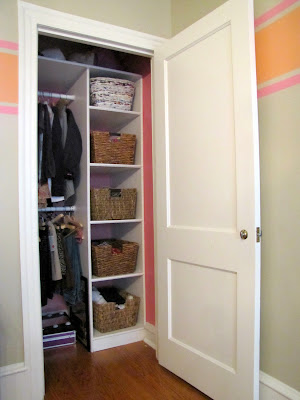
A carpenter installed a column of shelves and 2 hanging bars for Lily.
There is so much storage in that little space, that not much furniture was needed in the room itself.


We found a chalkboard decal online and applied it to the back of Lily's door.


Yes, she's a little bit country and a little bit rock & roll.
They are her guitars over on the corner. They work perfectly in this space!


The hanging panel on the terrace door is a ruffly little number from Anthropologie.


The area rug is a little bit granny's attic from Dash & Albert.
It was one of the first purchases for this room and really got the ball rollin'.


It's a lovely, unique room, and I hope Lily loves it for years to come.

Tuesday, October 18, 2011

{ ScotchBlue Painting Party }

Welcome to the ScotchBlue™ Painting Party! You’re just in time, because you’ve entered at the start of the party! A group of fantastic DIY bloggers, including myself, all completed projects with the help of ScotchBlue™ Painter’s Tape with Edge-Lock™ Paint Line Protector. Now we’re giving you the chance to read all of our tutorials, gather inspiration, have fun and win prizes! Check out my project tutorial below, and then jump to the next blog in the party to see even more inspirational DIY tutorials!


I'm starting off the party with my striped ceiling in my foyer...


I'm so happy with the results.
Here's how I did it...
First I painted a base coat.


I let it dry overnight, then I made small pencil marks.
I used a triangle to draw the line from the pencil mark, across the ceiling.
(I suggest doing a small room if this is your first time striping a ceiling)


I used a level (but you could use a board or anything long and straight) to carry the line across the ceiling. 


Then, I used Scotchblue Painters Tape to tape on the lines across the ceiling.


I used small pieces of tape to mark where I SHOULDN'T paint.


Painted and ta-da!


Here's how the foyer looked before the striped ceiling...


*ScotchBlue Brand reached out to me to participate in the ScotchBlue Painting Party to celebrate the launch of their new ScotchBlue Painter’s Tape with Edge-Lock Paint Line Protector. My post represents my honest experience with ScotchBlue Painter’s Tape. I am not being paid for my answers, but I did receive ScotchBlue Painter’s Tape to assist in completion.

Friday, October 14, 2011

{ Fort Kit }

It's birthday season around these parts.
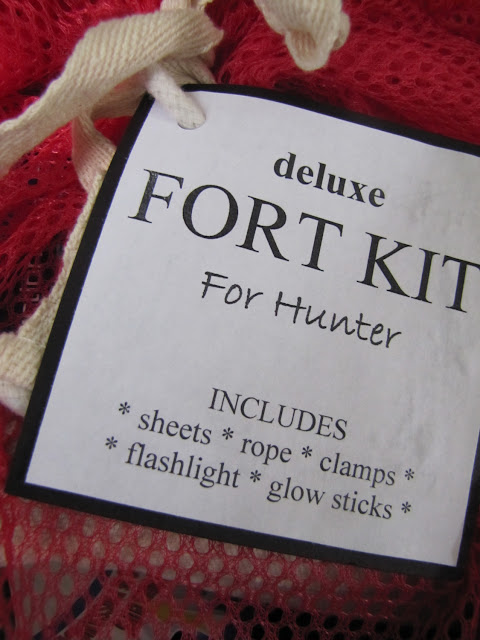
And I found the perfect gift for my kid's friends...


The kit is simple to put together.
Most items can be found at the 
Dollar Store or 5 Below.

Here's what we included in ours.


  • rope
  • flashlight
  • clamps/heavy duty clips
  • notebook
  • suction cups
  • drop cloths  (you could also use sheets)
  • glow sticks


I found the idea on Pinterest.
A pretty version of the kit can be found ...here.

linky up here


Home Stories A2Z